
When you write papers for school, your teachers may want you to use the MLA format. If you use Google Docs for your paper, it is not hard to set up the writing in the right way for MLA. You do not need to add any special programs to do this.
This blog post shows the different steps to set up the MLA format in Google Docs. It does not matter if you are learning the MLA style for the first time, or if you just want to remember how to do it. The details that can help you are written here.
What Is MLA Format and Why It Is Used?
 MLA means Modern Language Association. It is a common way to set up writing for school papers. Many schools use it. It is often for classes like English or subjects where people study human culture.
When people use the MLA format, their papers often have these things:
- The letters are often in the Times New Roman style and are size 12.
- There is an empty line of space between each line of writing.
- The empty space around the writing on all four sides of the page is 1 inch wide.
- At the very top of each page, in a special spot, is the student’s family name and the page number.
- At the start of the paper, there are four lines of information: the student’s name, the teacher’s name, the class name, and the date.
- The name of the paper is in the middle of the page, on its own line.
- The first line of each new block of writing starts a little bit to the right of the other lines.
When you set up your paper this way, it looks neat and serious. It also helps the teacher check everyone’s work in a similar way, because all the papers are set up in the same known way.
Good Reasons to Use Google Docs for MLA Setup
Google Docs is a program that costs no money to use and works over the internet. A lot of students use it already. It is good for school tasks for these reasons:
- You can use it on any computer or phone that can connect to the internet.
- The program saves your writing by itself as you type, so you do not lose it.
- It is not hard to show your work to teachers or other students in your class.
- You do not need to have other writing programs, like Microsoft Word, on your computer.
You can set up all parts of your paper right in the program on the internet. You do not need other special computer things to do this.
Steps for Setting Up MLA Format in Google Docs
Follow these actions to prepare your paper in the MLA style:
- Open Google Docs and choose to make a new, empty paper.
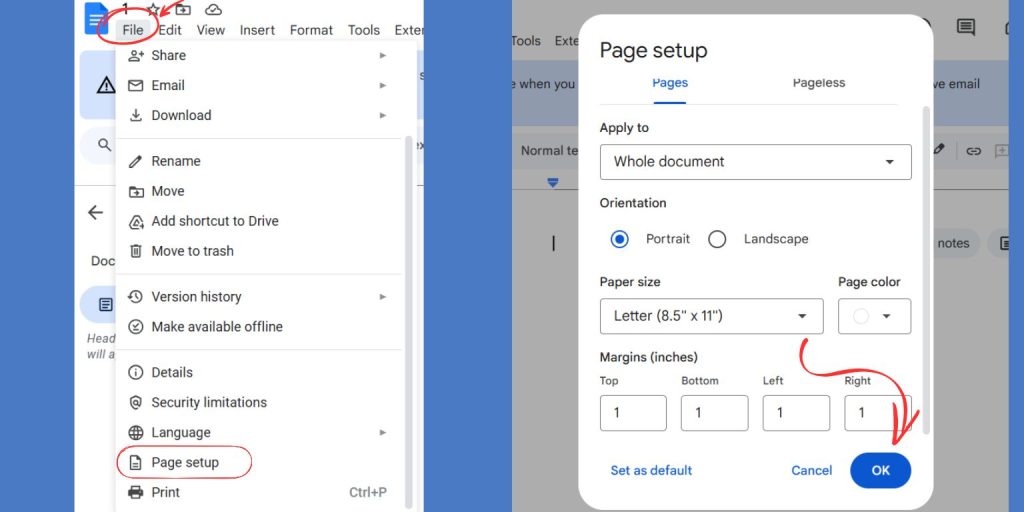
- Find ‘File‘ at the top. Then choose ‘Page setup.‘ In the choices that appear, make the empty space around all edges of the page 1 inch wide.
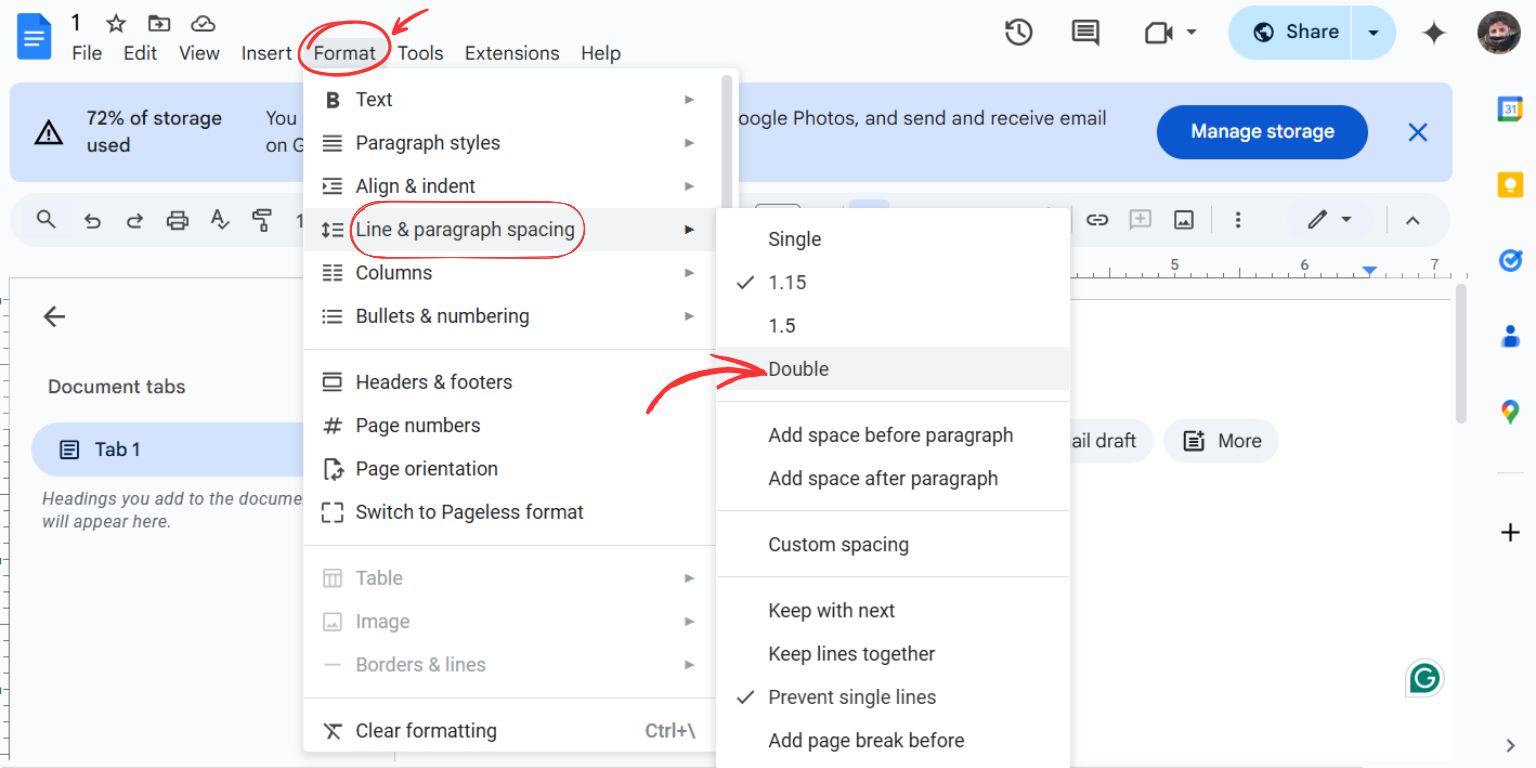
 Find ‘Format‘ at the top. Then choose ‘Line & paragraph spacing.’ From that list, select ‘Double‘ to make an empty line of space between each line of writing.
- Pick the Times New Roman style for your letters. Make the letter size 12.
- Make sure your writing lines up on the left side of the page. You can use the buttons at the top for this.
- At the top left part of your paper, type your full name. On the next line, type your teacher’s name. On the line after that, type the name of your class. On the fourth line, type the date.
- After the date, press the Enter key one time to go to a new line. Then, type the name of your paper. Make this name sit in the middle of the page.
- Press the Enter key again. Now, to start your first block of writing, press the Tab key once. This will move the first line in a little bit.
Your paper now has the basic look for the MLA style.
Adding the MLA Top Information and Page Number in Google Docs
This is a very needed part of the MLA format. Sometimes students forget to do this part. To do this, follow these actions:
- Find ‘Insert‘ at the top. Then choose ‘Headers & footers.’ From that list, select ‘Header.’
- A space will open at the very top of your page. In this space, type your family name and then press the space bar one time.
- While still in this top space, find ‘Insert‘ again. Then choose ‘Page numbers.’ Pick the choice that puts page numbers at the top right of the page.
- Check that your family name and the page number are lined up on the right side of the page.
This top information with your family name and page number will now show up on each page of your paper. This is how the MLA style asks for it to be.
How to Format the Works Cited Page
If you use ideas or words from other writers in your paper, the MLA style says to add a page called ‘Works Cited’ at the very end. These are the actions to make this page the right way in Google Docs:
- Begin this page on a fresh, new page. To do this, find ‘Insert‘ at the top, then ‘Break,’ then choose ‘Page break.’
- At the top of this new page, type the words ‘Works Cited‘. Make these words sit in the middle of the page.
- Use the Times New Roman style for letters, size 12. Also, make sure there is an empty line of space between each line of writing (double spacing).
- Each entry on this page usually begins with the family name of the writer whose work you used.
- For each entry, the first line starts at the left edge. If the entry is longer than one line, the next lines start a little bit to the right. This is called a ‘hanging indent.’ To do this:
- Find ‘Format‘ at the top. Then choose ‘Align & Indent.’ Next, pick ‘Indentation Options.’ A box will open. In that box, find ‘Special indent‘ and choose ‘Hanging‘ from its list.
An entry might look like this: Smith, John. The History of Art. Penguin, 2020. Make sure to list all the entries in A-B-C order by the first word of each entry (usually the writer’s family name).
An Extra Tip: Using Google Docs’ Own MLA Paper Form
If you want to do less of the setup work yourself, Google Docs has an MLA paper form already made that you can use at no cost. This is how you find and use it:
- Go to the main page for Google Docs on the internet (docs.google.com).
- Look for ‘Template Gallery’ near the top right part of the page and select it.
- Find the part called ‘Education.’ In that part, pick the one named ‘Report MLA’ or similar.
- This form will have sample writing. Take out the sample writing and put your own writing in its place.
This can be a quicker way if you need to finish fast or if you are not sure how to set up all the parts.
Mistakes Some People Make with MLA in Google Docs
 Even when people use a ready-made MLA paper form, small mistakes can still happen. Try not to make these mistakes:
- Using letters that are not the right style or size.
- Not having an empty line of space between all lines of writing in the whole paper.
- Forgetting the information (family name and page number) at the top of each page.
- Not making the special spacing for entries on the Works Cited page (the hanging indent).
- Making the name of the paper bold or with slanted letters. It should just be plain letters, in the middle of the page.
It is a good idea to check your whole paper one more time before you give it to your teacher.
Last Ideas: MLA Format in Google Docs
If you follow these actions, your paper will look neat and well put together. This will help you do what your teacher asks for. Google Docs helps people set up the MLA style without much trouble.
You do not need any extra computer programs or things you add on. All you need is your way to get on the internet and the information shown here.
Do you have a question about setting up MLA format? You can write it in the comments below. Or, you can show this information to another student in your class who might need help with it.
