BCC means Blind Carbon Copy. It hides email addresses from other recipients. In Microsoft Outlook, this feature helps keep contact lists private. Many professionals use it when sending group emails or newsletters. It protects privacy and keeps replies organized. Outlook makes this simple across desktop, web, and mobile apps.
What is the Difference Between CC and BCC?
In Outlook emails, CC stands for Carbon Copy. It shows all recipients to each other. BCC hides the addresses.
Here’s a quick view:
| Field | Visible to Others | Use When |
|---|---|---|
| To | Yes | Main recipient |
| CC | Yes | Sharing for info |
| BCC | No | Keeping addresses private |
Using BCC helps prevent spam and maintains confidentiality. It’s useful for office announcements or client messages.
How to Add BCC in Outlook Desktop
 If you use Outlook on Windows or Mac, follow these steps:
- Open Microsoft Outlook.
- Click New Email.
- Go to the Options tab in the ribbon.
- Choose BCC to show the field.
- Type the hidden recipient’s address in the BCC box.
- Write your message and send it.
This setting stays active for future emails until you turn it off. In Outlook 365 or 2019, it’s under the same Message options area.
Tip: Use Outlook Quick Steps to add BCC faster if you send group emails often.
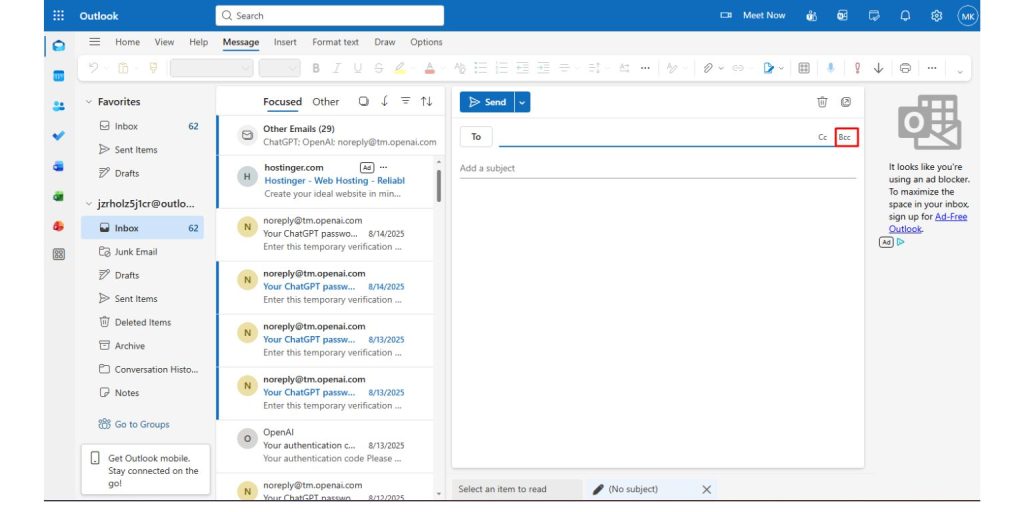
How to Add BCC in Outlook Web App (Outlook.com or Microsoft 365)
The web version looks a bit different but works the same:
- Sign in at Outlook.com or Office.com.
- Click New Message.
- Select the three-dot menu (…) near the top.
- Choose Show BCC.
- Add addresses to the BCC field.
- Type and send your email.
You’ll now see the BCC line in all new messages. This works in browsers like Chrome, Edge, or Safari.
How to Add BCC in Outlook Mobile (iPhone & Android)
On phones or tablets, the steps are simple:
- Open the Outlook app.
- Tap the Compose icon (pencil).
- Tap CC/BCC to open more fields.
- Enter addresses in the BCC line.
- Add your message and tap Send.
The BCC option is part of the same screen as the main email fields. It’s useful when sending to multiple clients on the go.
How to Automatically Add BCC in Outlook
You can make Outlook add BCC every time. This helps when sending reports or internal copies.
Steps for the desktop app:
- Go to File > Manage Rules & Alerts.
- Create a New Rule.
- Choose Apply rule on messages I send.
- Add BCC recipients under the actions section.
- Save and apply the rule.
You can also use VBA scripts or Outlook add-ins for advanced automation.
Note: Web and mobile versions don’t support auto BCC yet.
Troubleshooting BCC Issues
If the BCC field doesn’t appear, try this:
- Check the Options tab to make sure it’s enabled.
- Update Outlook if the feature is missing.
- Ask your Microsoft 365 admin if it’s restricted.
- Reset the Outlook view if the ribbon was customized.
Some companies hide BCC for security or compliance reasons.
BCC Best Practices and Email Etiquette
Here’s how to use BCC wisely:
- Use it when sending to large groups.
- Don’t overuse it for regular communication.
- Avoid including clients who should not see each other’s details.
- Use CC when transparency matters.
BCC builds trust when used correctly. It keeps personal or sensitive data secure. Always respect others’ privacy and company policy.
Conclusion
Adding BCC in Outlook is easy once you know where to look. It helps send clean, private, and professional emails. Whether on desktop, web, or mobile, this feature keeps your communication safe. Learn to use Outlook tools like Rules and Add-ins to save time.
If this guide helped you, share it with others or drop a comment with your question or tip.
